Nexus Configuration under Windows
Please download Nexus Configuration Utility for Windows from the Downloads section of our website. Please decompress the zip archive to a folder and run Setup.exe and follow the prompts.
Now connect to your Nexus using the same method as you connect to any Wi-Fi network. Your Nexus will be displayed as 'AD_Nexus_XXXXX' where XXXXX is the serial number of your Nexus that can be found on the back under the wall mounting plate - just look at the last five digits. Please allow a couple of minutes until Windows makes the connection.
Go to Start->All Programs->Astro Devices->Nexus Configuration Utility and run it. Press 'Load Configuration' and the utility will connect to your Nexus and display the current configuration:
 The screenshot above shows the default configuration of your Nexus.
You can change various parameters and then save the configuration. Please note that you may not be able to connect to Nexus if you change any of the WiFi settings except 'Transmission Power'.
For example, if you want to connect Nexus to your Wi-Fi network or your Android's hotspot network MyWiFi and set the encoders to be 4096 steps per revolution then you can change it like: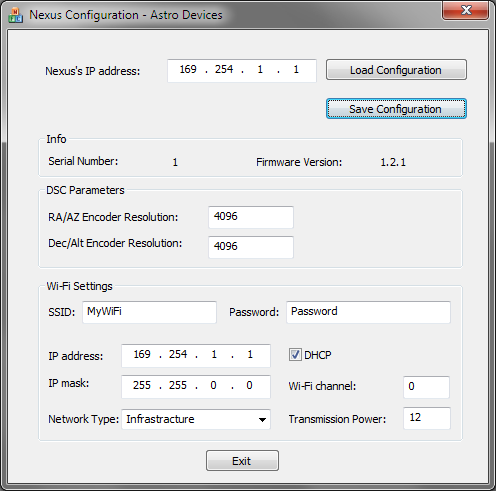 Please note that when 'Wi-Fi Channel' is set to 0 it means that Nexus will scan all channels and connect to MyWiFii in case of using Nexus in infrastructure mode using DHCP the IP address and IP mask are not used and can be left unchanged. The Wi-Fi channel must not be equal 0 in case of using Ad-hoc mode.
The next version of the configuration utility will allow changing all other parameters as well.